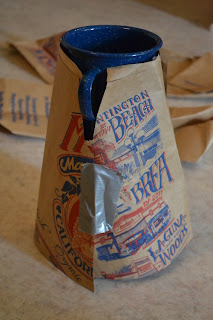
I'd been admiring the windscreen that comes with the Caldera Cone System and thought I could make something similar, but for a fraction of the price. This is what we're going after:

And this is how the finished product will look:


As you can notice, this is a pretty tall windscreen. Any suggestions on how to pack this? Share your suggestions in the comments!
EDIT: Beware of your stove overheating if you completely enclose your stove. Always try with a small flame first, with the windscreen only half-closed, and read what happened to this camping stove.
And this is how the finished product will look:
 |
| DIY "Caldera Cone" stove windscreen |
What you will need:
- Paper grocery bag
- Aluminum food pan (approx. 11" x 19") or oven liner
- Glass bottle (or anything that's hard, smooth and round)
- String
- Sharpie
- Ball point pen
- Serrated knife
- Craft blade
- Scissors
- Duct tape
- Your stove and pot

Instructions
- Cut apart the paper bag so you have a large piece that lies flat.
- Cut out a rough sketch of the shape you will need for the stove windscreen. Trim pieces off or tape pieces on until it fits your stove and pot pretty well.

- With the serrated knife, saw off the corners of the aluminium pan.

Discard these - "Iron" out the aluminum with the glass bottle, on a counter top, until it's smooth and lays pretty flat.
- Tape the paper pattern to the aluminum, and tape the aluminum to the floor.
- Using the string tied to the ball point pen, and holding the other end of the string around a pivot, draw a section of a circle that follows your paper draft. The ball point pen won't leave a pen mark, but by pressing it down hard, you'll leave a dent that will be visible after you remove the paper.
- Draw both the inner and outer circles, making sure you use the same point to pivot.
- With the sharpie, mark Xs where the corners are going to be. Make sure the corners line up along the stretched out string. Your paper model probably wasn't perfectly straight, but now, using the string as a guide, they will be.
- Remove the paper draft. You should see the indentation marking the top and bottom curves of your cone.
- Tie the sharpie to the string with the same pivot point, and redraw your shape, this time with no paper pattern in the way. Use a straight edge or ruler to connect the Xs on the sides.
- Cut out your cone using the craft blade, leaving about half an inch extra on each side, and a few millimetres extra on the top and bottom. You will need this extra allowance for the overlapping notches on the sides, and for folding over sharp edges on all sides.
- Place your aluminium on a carpet and use the back of the knife to make a dent along the curved sharpie lines on the top and bottom. Fold over, and iron out with the glass bottle.

- Do a "fitting" and double check to make sure that so far, your cone fits around your stove and pot and is the proper height.
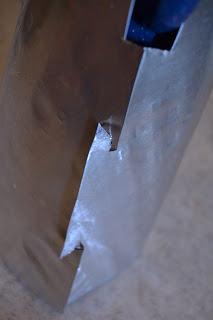
- Mark where to cut the notched hooks at the 1/3 and 2/3 points along the side edges. See photo below for how they will look in the end. I recommend doing this using paper first!!! There are a couple of things to watch out for.
Most importantly, the widest points on part A (see red dots on photo above) should be the same width as the narrowest points on part B. So the tab on B will look a LOT wider than the notch on A.
This is how it will look, when you roll up the cone to align the notches. - After you're confident that you've marked the parts correctly and they line up properly, cut the notches, then fold down the edges. Do not cut along the sides, because you'll end up with sharp edges that can cut you while assembling your windscreen. An added benefit is that you'll get extra notches on part A that will help hold the sides together.
- Try fitting the sides together. I had a hard time sliding the sides together, so I enlarged a cut on part B (see red arrow on photo).
- Do another fitting. With a sharpie, mark how far down the gap will need to go, to leave space for the handles of the pot.
- Cut notches where you made your mark, then fold in the edges.
- Use the bottle to iron out rough edges, as needed. At this point, this is how an edge should look, with all its folds:

- Do another fitting and double check that the notches fit together, and that there is adequate space for the handle of your pot or mug.
- With a sharpie, mark dots roughly where you would like the air vents to be. Make the dots visible from the back side by making dents with the ball point pen.
- Flatten out your cone, and if you want to be neat, use the same string-and-pen trick to line up the vents properly with the bottom of your cone.

- Mark "I" shapes with a sharpie, where you will make cuts. I made three 3-inch long vents, spaced 3 inches apart.
- Cut along the lines with your blade, make dents with the back of your knife as appropriate, then fold over the edges to make your vent.


- Iron out all the edges.


You're done!!!
As you can notice, this is a pretty tall windscreen. Any suggestions on how to pack this? Share your suggestions in the comments!
EDIT: Beware of your stove overheating if you completely enclose your stove. Always try with a small flame first, with the windscreen only half-closed, and read what happened to this camping stove.
read the other post about the stove nearly exploding (yikes!) and read this one too. how much water (ml) you think this could support without crumbling? i plan to pick up a 'HD turkey pan' tomorrow and see what i can make happen.
ReplyDelete