Showing posts with label gear. Show all posts

Awesome Places to Shop for Outdoor Gear


I've had several people ask me where I shop for camping and backpacking gear. These are my go-to stores, whether I'm just browsing or looking for something in particular.

REI 

They carry only quality gear from name brands; any gear you get at REI will last you years. Plus, they have an amazing return policy. Become a member and shop at the quarterly REI Garage Sale to get amazing deals.

Adventure 16

If you're lucky enough to have an A16 Outfitters store near you (they have locations in Southern California), they carry a very well-curated selection of high quality gear. Imagine REI, but it's smaller and feels like family! They often have free community events such as photography slide shows and talks about outdoor gear.


Gossamer Gear

These guys are known for their amazing ultralight backpacks, but they also carry all kinds of other ultralight gear.


Backcountry and Sierra Trading Post


If you have an item in mind that you'd like to buy, it's worth doing a price check on these sites. They often have sales for certain brands or categories of gear and offer free shipping over a certain amount. (And if you're in Canada, shop at MEC.)


http://www.steepandcheap.com/steepcheap/gear-cache

Steep and Cheap

Everything you find here is on sale! You'll have to check back often, but if you see something on here that you like, just get it before the time runs out, because items are around 50% off retail.

Amazon


And for everything else, there's Amazon!

Happy shopping!

How to score big on the REI Used Gear Sale


Today was my second time at the REI Used Gear Sale (which is now called REI Garage Sale). In total, from these two sales, I've scored some amazing finds:

Like-new REI Quarter Dome 3 tent for $139 ($200 new)
Like-new Merrell minimalist running shoes for $52 ($100 new)
Gently used Osprey Poco Plus child carrier for $125 ($260 new)
Patagonia down jacket for $70 ($160 new)
ENO double deluxe hammock for $26 ($85 new, missing carabiners and knots undone)
Used double layered socks for 83 cents ($8 new)
Used cap for $7 ($22 new)
Like-new base layer for babies for $12 ($25 new)

That's savings of $430, or 50%!!! Obviously some items, like tents, backpacking backpacks and GoPro cameras, have high demand and you have to have a strategy to snag the ones you like. Here are my tips for scoring the best deals:

1. Do some scouting beforehand

Visit the REI store on the previous night and see where they've kept everything. Different stores do it differently; some keep items on racks in their parking lot, some block off one part of the store, and others spread items out in marked boxes in their respective departments (tents in the tent section, shoes near the shoe section, etc.) Try to remember the general areas where your top coveted items are placed.

2. Have a "wishlist"

Do your research beforehand and check reviews for your top most-needed items. For example, I know I wanted a 3- or 4-person tent. So I wrote a list of all the tents at REI that I would take, if they had it on sale. I had my first choice, second choice, etc., so I didn't have to waste time thinking about which one is better, having to look up ratings on my phone, etc.

3. Bring a BIG shopping bag

I prefer IKEA shopping bags, they're huge and strong enough to fit tons of stuff. You definitely need it, too -- see #6.

4. Get there early

Some stores only let in small groups or people in at a time, thus preventing a huge crowd and chaos, and also rewarding the early birds. If necessary, camp out... but make sure that you know what system the store will be using. You don't want to camp out overnight or stand in line at 4am, only to find out that everyone gets let in at the same time. And when you do get in, make a beeline towards your first-choice items.

5. Work as a team

Have a partner or go with a small group, so that after everyone has picked out their top choice items, you can all sort through your pile and return to the bins at your leisure, while someone guards the pile at all times.

6. If you're considering getting it, hold on to it

Don't pass something by, thinking you can get back to it. Chances are, someone else will have taken it. Grab it first, and decide later if you really want it.

7. Beware the impulse buy

Items bought at the REI Garage Sale cannot be returned, so don't buy junk just because it's cheap. Make sure you're buying stuff that you will actually use.

8. Go back for seconds

Later on, people will be putting back items they decided not to buy. So you can often score some great finds after the initial mad rush has ended. That's how I got the ENO hammock! Go back, check the bins and racks again for items you're still missing from your wishlist, and walk around the store to check out the little piles that people have left scattered around.

Do you have other tips on what strategies to use? What were your experiences at the REI sale? Share in the comments! Good luck and happy shopping!

Backpacking in minimalist trail-running shoes

You might have heard the old adage of 1 pound on the feet equals 5 pounds on the back. Because of this, I've been slowly getting used to hiking in minimalist trail-running shoes, in preparation for climbing Mt. Whitney.
 
My beautiful Merrell shoes

How slowly? I got the shoes in mid-June, and in almost 2 months, I was up to jogging ~5 miles in them without my ankle or Achilles tendon hurting.

The shoes underwent their first real test this weekend, when I went backpacking in them for the first time. During the two-day trip, we hiked 11.6 miles and covered an elevation difference of 4,300 ft. I didn't weigh my pack, but it probably weighed around 25 lbs including water, which we had to carry with us. Now, a day after the trip, I can barely walk down stairs due to sore muscles, but my ankles are fine! Success. This means I will be hiking Mt. Whitney in these minimalist shoes.

It was interesting stepping on a pebble for the first time. You feel sharp rocks a lot more than in hiking boots, and even tennis shoes! Oh, and do not kick any cacti or agave, those thorns will go straight through the mesh parts!

What are your experiences backpacking in minimalist shoes? Post your comments below!

Windscreen broke a camping stove

I went camping last weekend, and in an attempt to make a friend's small MSR stove more efficient, we placed an impromptu windscreen around it, that was originally made for use with a lantern.

The result:
  • after a few minutes, the flame mysteriously went out
  • when I tried to turn off the gas, the flame adjuster gave me a second-degree burn on my finger
  • the plastic "clicker" that would spark the gas to a flame had completely melted
  • we could no longer untwist the burner from the fuel canister, because the valve on the canister had broken and would spew fuel at full force if we tried to untwist it
I do not like to think of this, but we were probably seconds away from having the whole canister explode, it had overheated so much. And this was a reliable stove that had lasted years.

Now I'm not so sure of trying out the windscreen I made in this post! I'll definitely leave it in a more "open" position and only half-surround the stove. Any suggestions and safety tips for using a windscreen around a stove?

Swedish Firesteel vs Magnesium Fire Starter

My brother and I both had our fire starters on a recent camping trip, and we decided to have a race: who could start a fire first? We created our tinder piles with shaved magnesium, mugwort, dried grasses and punk wood (dead wood that has gone through dry rot). And the race was on!


Sparks went flying, but in the end, neither of us got an ember. We think it was the tinder's fault. We'll have to try making some char cloth. Also, we had some liquid camping fuel but didn't use it for our race.

My brother eventually got frustrated that the striker fell out of his magnesium fire starter. He ended up bending it with a rock and throwing it in our camp fire at night. Nothing happened for half an hour, and then all of a sudden it lit and started burning as bright as the sun! It was so bright, we couldn't look at it, or else we'd get blinded.

By the way, as my emergency fire starting tools, I always carry a waterproof case with matches and the striker from a matchbox, as well as a cheap lighter. What kinds of fire starters and tinder do you carry at all times? Share your comments!

DIY Cone Windscreen for Stove

I'd been admiring the windscreen that comes with the Caldera Cone System and thought I could make something similar, but for a fraction of the price. This is what we're going after:


And this is how the finished product will look:

DIY cone stove windscreen
DIY "Caldera Cone" stove windscreen

What you will need:

  • Paper grocery bag
  • Aluminum food pan (approx. 11" x 19") or oven liner
  • Glass bottle (or anything that's hard, smooth and round)
  • String
  • Sharpie
  • Ball point pen
  • Serrated knife
  • Craft blade
  • Scissors
  • Duct tape
  • Your stove and pot

Instructions

  1. Cut apart the paper bag so you have a large piece that lies flat.
  2. Cut out a rough sketch of the shape you will need for the stove windscreen. Trim pieces off or tape pieces on until it fits your stove and pot pretty well.
  3. With the serrated knife, saw off the corners of the aluminium pan.
    Discard these
  4. "Iron" out the aluminum with the glass bottle, on a counter top, until it's smooth and lays pretty flat.
  5. Tape the paper pattern to the aluminum, and tape the aluminum to the floor.
  6. Using the string tied to the ball point pen, and holding the other end of the string around a pivot, draw a section of a circle that follows your paper draft. The ball point pen won't leave a pen mark, but by pressing it down hard, you'll leave a dent that will be visible after you remove the paper.
  7. Draw both the inner and outer circles, making sure you use the same point to pivot.
  8. With the sharpie, mark Xs where the corners are going to be. Make sure the corners line up along the stretched out string. Your paper model probably wasn't perfectly straight, but now, using the string as a guide, they will be.
  9. Remove the paper draft. You should see the indentation marking the top and bottom curves of your cone.
  10. Tie the sharpie to the string with the same pivot point, and redraw your shape, this time with no paper pattern in the way. Use a straight edge or ruler to connect the Xs on the sides.
  11. Cut out your cone using the craft blade, leaving about half an inch extra on each side, and a few millimetres extra on the top and bottom. You will need this extra allowance for the overlapping notches on the sides, and for folding over sharp edges on all sides.
  12. Place your aluminium on a carpet and use the back of the knife to make a dent along the curved sharpie lines on the top and bottom. Fold over, and iron out with the glass bottle.
  13. Do a "fitting" and double check to make sure that so far, your cone fits around your stove and pot and is the proper height.
  14. Mark where to cut the notched hooks at the 1/3 and 2/3 points along the side edges. See photo below for how they will look in the end. I recommend doing this using paper first!!! There are a couple of things to watch out for.
    This is how it will look, when you roll up the cone to align the notches.
    Most importantly, the widest points on part A (see red dots on photo above) should be the same width as the narrowest points on part B. So the tab on B will look a LOT wider than the notch on A.
  15. After you're confident that you've marked the parts correctly and they line up properly, cut the notches, then fold down the edges. Do not cut along the sides, because you'll end up with sharp edges that can cut you while assembling your windscreen. An added benefit is that you'll get extra notches on part A that will help hold the sides together.
  16. Try fitting the sides together. I had a hard time sliding the sides together, so I enlarged a cut on part B (see red arrow on photo).
  17. Do another fitting. With a sharpie, mark how far down the gap will need to go, to leave space for the handles of the pot.
  18. Cut notches where you made your mark, then fold in the edges.
  19. Use the bottle to iron out rough edges, as needed. At this point, this is how an edge should look, with all its folds:
  20. Do another fitting and double check that the notches fit together, and that there is adequate space for the handle of your pot or mug.
  21. With a sharpie, mark dots roughly where you would like the air vents to be. Make the dots visible from the back side by making dents with the ball point pen.
  22. Flatten out your cone, and if you want to be neat, use the same string-and-pen trick to line up the vents properly with the bottom of your cone.
  23. Mark "I" shapes with a sharpie, where you will make cuts. I made three 3-inch long vents, spaced 3 inches apart.
  24. Cut along the lines with your blade, make dents with the back of your knife as appropriate, then fold over the edges to make your vent.

  25. Iron out all the edges.
     

You're done!!!


As you can notice, this is a pretty tall windscreen. Any suggestions on how to pack this? Share your suggestions in the comments!

EDIT: Beware of your stove overheating if you completely enclose your stove. Always try with a small flame first, with the windscreen only half-closed, and read what happened to this camping stove.

Gear: camping stoves

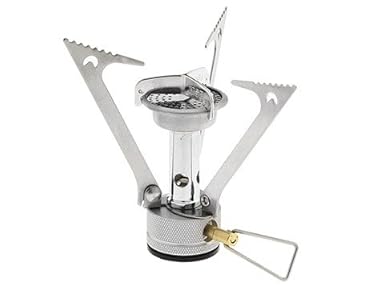
I've had my camping stove, an MSR Pocket Rocket, for over 5 years now, and last week was the first time it started acting funny. It seemed like gas wouldn't come out. Granted, it was windy and extremely dusty (read: occasional whiteout conditions).
So, now that I've been gradually making my switch to ultralight gear, I feel like it's time for an upgrade (or downgrade, depending on how you look at it). Overall, I would buy this piece of gear again... it it weren't for this neat stove that I found! A DIY stove you can make out of a tin can and burn alcohol in.


So now I'm trying to decide between the above hobo stove, which uses liquid alcohol for fuel, and the Esbit stove and pot stand, which uses solid fuel. Solid fuel provides more heat for a minimal amount of weight, and is therefore ideal for ultralight backpacking. But both of these options, alcohol and solid-fuel stoves, are slow to bring water to a boil.

Here's an excellent blog post by Josh Spice, who compares the weight versus efficiency of multiple types of stoves.

Or I might just have to go no-cook and buy a dehydrator instead!

What kind of stove do you use, if any? Leave a comment and share!

Making the switch to ultralight

I've been getting more and more enamored by how lightly the ultralight hikers travel, so I've decided to switch. I've been slowly switching my "big 3", and have so far replaced my tents, sleeping bag and backpack, with the latest item being the Mariposa Plus Ultralight backpack from Gossamer Gear; I asked for it for Christmas. :)

Here is how much my old gear weighed:

Category Item Model Weight (lbs)
Shelter and Sleeping System Tent Unknown 6.8
Shelter and Sleeping System Sleeping Bag Eddie Bauer 30-50 w/ Comfort Shell 6
Packing Backpack Kelty 75? ~4


TOTAL WEIGHT 12.8
Here is the weight of my new gear:

Category Item Model
Weight (lbs)
Shelter + Sleep System Tent Big Agnes Fly Creek UL2 2.625
Shelter + Sleep System Sleeping Bag North Face Women's Cat's Meow 20 deg 2.625
Packing Backpack Gossamer Gear Mariposa Plus Ultralight 1.39375


TOTAL WEIGHT 6.6

That's almost a 50% reduction in weight! I can't wait to try them all out, together. How much does your "big three" weigh? Share in the comments!